Skip to product information
1 of 3

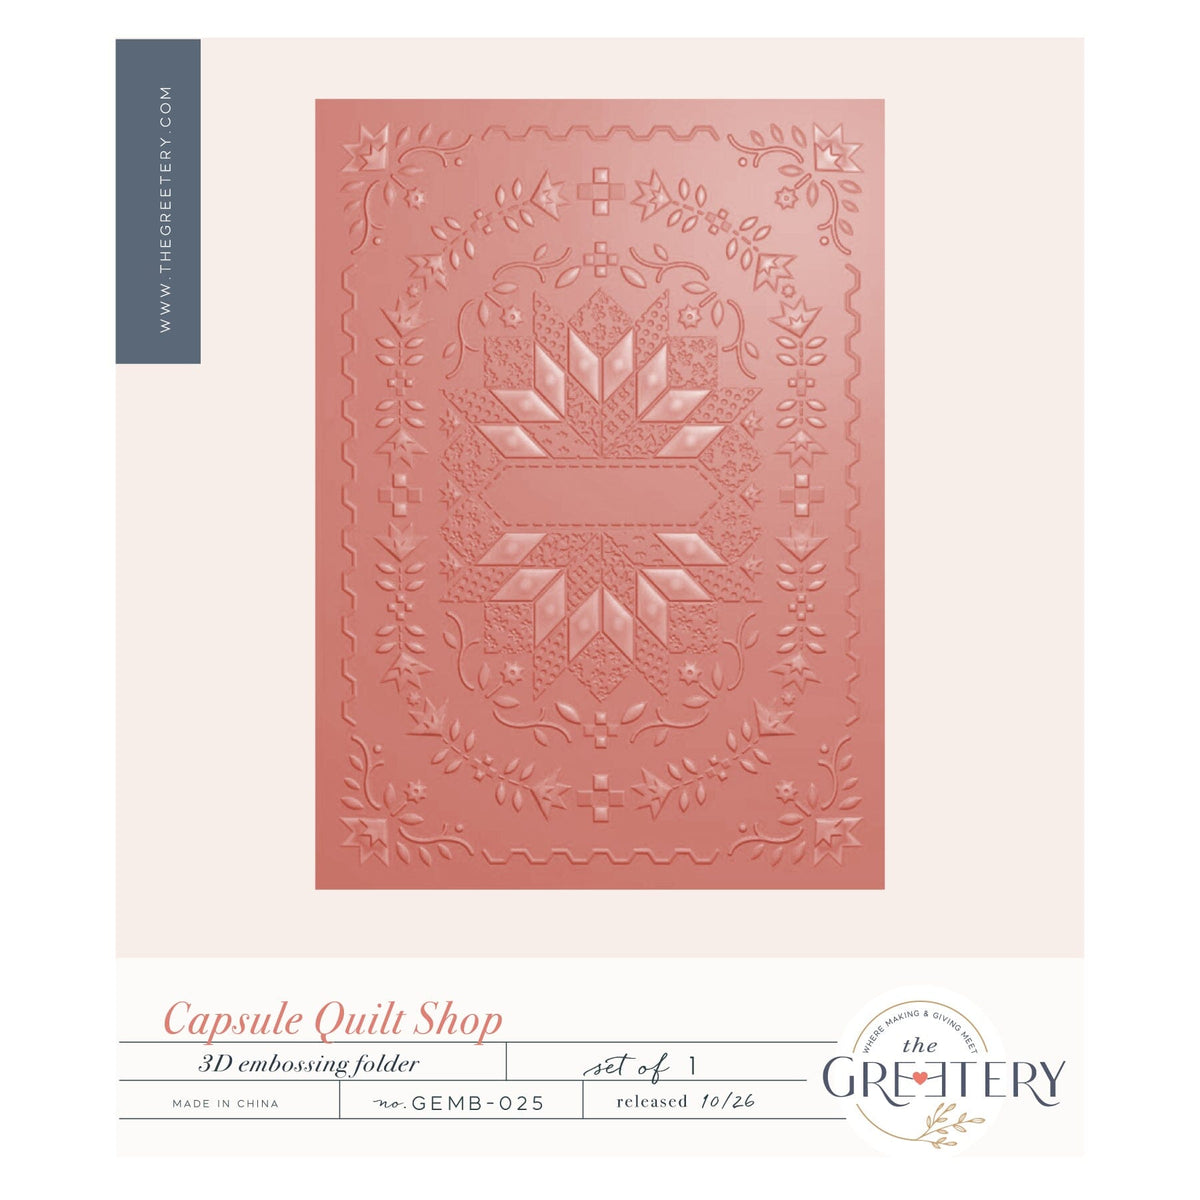
Capsule Quilt Shop Embossing Folder

Regular price
$14.00 USD
Regular price
Sale price
$14.00 USD
Shipping calculated at checkout.

    Our Capsule Quilt Shop suite wraps your Capsule Basics up in warm and cozy quilted goodness! This embossing folder coordinates with our Capsule Basics die and the other products from our Capsule Quilt Shop suite, allowing you to create gorgeous embossed designs. Add some color by pairing this embossing folder with our Quilt Shop stencil, or create individual embossed accents by pairing this embossing folder with the matching Quilt Shop die. The oval border that's incorporated into the design also coordinates with our Capsule Fixed Border Large die, making quick and easy work of creating pretty embossed frames. So many fun options with this set! 

    For more ideas, visit our Lookbook!

    Note: This embossing folder is deeply etched and very detailed, therefore we recommend pairing it with papers with a soft hand for smoother embossing. For papers that have a crisper surface we recommend pairing it with the coordinating star detail die, which gives the deeply embossed areas more freedom to expand. See the Sandwich & Tips tab within this description box for more tips, etc. 

    Embossed design fills a 5" x 7", but the interior portion is designed to fit nicely on A2 cards. 

    Related Videos

    Sandwich Recommendations & Tips

    Our 3D embossing folders can be paired with most table-top diecutting machines on the market. Refer to your machine's manual for the recommended sandwich specifically for 3D embossing folders. 

    Here are the recommended sandwiches for some of the more popular machines:

    Spellbinders Platinum 6:

    • Base Plate
    • embossing folder with paper inside
    • Adapter plate D (it’s typically a grey plate, on older models it may be dark blue)

    Big Shot or Vagabond:

    • Standard platform base
    • Thin die adapter
    • Embossing folder with paper inside
    • Clear cutting plate

    Cuttlebug:

    • Base plate A
    • embossing folder with paper inside
    • C plate

    Gemini/Gemini Jr:

    • Base clear cutting plate
    • Magnetic shim
    • Embossing folder with card/paper inside
    • Plastic shim

    TIPS:

    Our 3D embossing folders add gorgeous texture to your projects! The effects can vary depending on the materials used - paper thickness and "hand" will have an effect on your results.

    Since embossing requires the paper to stretch and mold, it's typically better to use papers that have a soft, flexible texture rather than papers with a “crisp” surface or hand. Medium weight papers (80-100lb) typically provide the best results. Some of our favorite cardstock brands for embossing include Colorplan, Materica, and also the Construction and Pop-Tone collections from French paper.

    In addition to using appropriate materials and sandwiches, here are a few tips for getting the best, smoothest, most beautiful embossing possible:

    • Mist your paper. You can mist front and back, or if you have done stenciling or inking as a first step, mist from the backside only. Allow a few moments for the paper fibers to absorb the moisture before running it through your machine.
    • Include a piece of wax paper in your sandwich (the stuff on a roll in your kitchen drawer!). Place a piece on top of your cardstock (between the right side of your cardstock and the folder), waxy side towards your folder so that it doesn't give off onto your cardstock. 
    • Back your cardstock with a piece of Press n Seal (again from your kitchen drawer!). Place a piece of Press n Seal on the back side of your cardstock, sticky side against the backside of the paper. You can cover the whole sheet or just a portion as needed. Once embossed, just leave it on the backside of your cardstock and attach the embossed panel or element to your project.
    • Speaking of Press n Seal, it's a great tool for adding a bit of tacky surface to your folder. Place a piece of it inside your folder and run it through your machine (no paper). After running it through, remove it from your folder and the surface is now tacky, making it a bit easier to line up diecuts inside your folder. 
    • Embossing can cause slight changes in size of paper and design elements, due to the paper expanding and molding to the embossed design. To accomodate this, you may want to start with a slightly larger panel than your desired finished size. For example, if your finished card size is 5x7, you may want to start with a 5-1-/4" x 7-1/4" panel, then trim after embossing. 
    • This expansion can also cause some shifting when combining stenciling or stamping with embossing. One of our favorite techniques it to stencil first, then emboss by running your sandwich half-way through your machine and back out, then repeat this half-in, half-out process starting from the opposite end. This helps reduce the "stretch" that occurs from running your sandwich though in a single direction. You might find it easier to emboss first and then stencil - this is personal preference and you should choose whichever method you prefer.

    The best technique from the list above is very dependent on the materials used, so we recommend doing a bit of experimenting before committing to a large scale project to make sure your materials are creating the desired results.

    Release Date
    Capsule Quilt Shop Embossing Folder
    Capsule Quilt Shop Embossing Folder
    {"id":15393689043245,"title":"Capsule Quilt Shop Embossing Folder","handle":"capsule-quilt-shop-embossing-folder","description":"\u003cp\u003e\u003ca href=\"https:\/\/\/thegreetery.com\/collections\/capsule-quilt-shop\" title=\"capsule quilt shop suite\"\u003eOur Capsule Quilt Shop suite\u003c\/a\u003e wraps your Capsule Basics up in warm and cozy quilted goodness! This embossing folder coordinates with our \u003ca title=\"capsule basics die\" href=\"https:\/\/thegreetery.com\/products\/capsule-basics-die\"\u003eCapsule Basics die\u003c\/a\u003e and the other products from our \u003ca href=\"https:\/\/\/thegreetery.com\/collections\/capsule-quilt-shop\" title=\"capsule quilt shop\"\u003eCapsule Quilt Shop suite\u003c\/a\u003e, allowing you to create gorgeous embossed designs. Add some color by pairing this embossing folder with our \u003ca href=\"https:\/\/\/thegreetery.com\/products\/capsule-quilt-shop-stencil\" title=\"capsule quilt shop stencil\"\u003eQuilt Shop stencil\u003c\/a\u003e, or create individual embossed accents by pairing this embossing folder with the matching \u003ca href=\"https:\/\/\/thegreetery.com\/products\/capsule-quilt-shop-die\" title=\"capsule quilt shop die\"\u003eQuilt Shop die\u003c\/a\u003e. The oval border that's incorporated into the design also coordinates with our \u003ca href=\"https:\/\/thegreetery.com\/products\/capsule-fixed-borders-large-die\" title=\"capsule fixed borders large die\"\u003eCapsule Fixed Border Large die\u003c\/a\u003e, making quick and easy work of creating pretty embossed frames. So many fun options with this set! \u003c\/p\u003e\n\u003cp\u003e\u003cspan style=\"font-family: -apple-system, BlinkMacSystemFont, 'San Francisco', 'Segoe UI', Roboto, 'Helvetica Neue', sans-serif; font-size: 0.875rem;\"\u003eFor more ideas, visit our \u003c\/span\u003e\u003ca href=\"https:\/\/thegreetery.com\/pages\/capsule-quilt-shop-lookbook\" title=\"capsule quilt shop lookbook\" style=\"font-family: -apple-system, BlinkMacSystemFont, 'San Francisco', 'Segoe UI', Roboto, 'Helvetica Neue', sans-serif; font-size: 0.875rem;\"\u003eLookbook\u003c\/a\u003e\u003cspan style=\"font-family: -apple-system, BlinkMacSystemFont, 'San Francisco', 'Segoe UI', Roboto, 'Helvetica Neue', sans-serif; font-size: 0.875rem;\"\u003e!\u003c\/span\u003e\u003c\/p\u003e\n\u003cp\u003e\u003cspan style=\"font-family: -apple-system, BlinkMacSystemFont, 'San Francisco', 'Segoe UI', Roboto, 'Helvetica Neue', sans-serif; font-size: 0.875rem;\"\u003e\u003cstrong\u003eNote:\u003c\/strong\u003e This embossing folder is deeply etched and very detailed, therefore we recommend pairing it with papers with a soft hand for smoother embossing. For papers that have a crisper surface we recommend pairing it with the coordinating star detail die, which gives the deeply embossed areas more freedom to expand. See the Sandwich \u0026amp; Tips tab within this description box for more tips, etc. \u003c\/span\u003e\u003c\/p\u003e\n\u003cp\u003eEmbossed design fills a 5\" x 7\", but the interior portion is designed to fit nicely on A2 cards. \u003c\/p\u003e\n\u003ch2\u003eRelated Videos\u003c\/h2\u003e\n\u003ch2\u003eSandwich Recommendations \u0026amp; Tips\u003c\/h2\u003e\n\u003cp\u003eOur 3D embossing folders can be paired with most table-top diecutting machines on the market. Refer to your machine's manual for the recommended sandwich specifically for \u003cstrong\u003e3D embossing folders\u003c\/strong\u003e. \u003c\/p\u003e\n\u003cp\u003eHere are the recommended sandwiches for some of the more popular machines:\u003c\/p\u003e\n\u003cp class=\"p1\"\u003eSpellbinders Platinum 6:\u003c\/p\u003e\n\u003cul class=\"ul1\"\u003e\n\u003cli class=\"li1\"\u003e\n\u003cspan class=\"s1\"\u003e\u003c\/span\u003eBase Plate\u003c\/li\u003e\n\u003cli class=\"li1\"\u003e\n\u003cspan class=\"s1\"\u003e\u003c\/span\u003eembossing folder with paper inside\u003c\/li\u003e\n\u003cli class=\"li1\"\u003e\n\u003cspan class=\"s1\"\u003e\u003c\/span\u003eAdapter plate D (it’s typically a grey plate, on older models it may be dark blue)\u003c\/li\u003e\n\u003c\/ul\u003e\n\u003cp class=\"p1\"\u003eBig Shot or Vagabond:\u003c\/p\u003e\n\u003cul class=\"ul1\"\u003e\n\u003cli class=\"li1\"\u003e\n\u003cspan class=\"s1\"\u003e\u003c\/span\u003eStandard platform base\u003c\/li\u003e\n\u003cli class=\"li1\"\u003e\n\u003cspan class=\"s1\"\u003e\u003c\/span\u003eThin die adapter\u003c\/li\u003e\n\u003cli class=\"li1\"\u003e\n\u003cspan class=\"s1\"\u003e\u003c\/span\u003eEmbossing folder with paper inside\u003c\/li\u003e\n\u003cli class=\"li1\"\u003e\n\u003cspan class=\"s1\"\u003e\u003c\/span\u003eClear cutting plate\u003c\/li\u003e\n\u003c\/ul\u003e\n\u003cp class=\"p1\"\u003eCuttlebug:\u003c\/p\u003e\n\u003cul class=\"ul1\"\u003e\n\u003cli class=\"li1\"\u003e\n\u003cspan class=\"s1\"\u003e\u003c\/span\u003eBase plate A\u003c\/li\u003e\n\u003cli class=\"li1\"\u003e\n\u003cspan class=\"s1\"\u003e\u003c\/span\u003eembossing folder with paper inside\u003c\/li\u003e\n\u003cli class=\"li1\"\u003eC plate\u003c\/li\u003e\n\u003c\/ul\u003e\n\u003cp\u003eGemini\/Gemini Jr:\u003c\/p\u003e\n\u003cul\u003e\n\u003cli\u003eBase clear cutting plate\u003c\/li\u003e\n\u003cli\u003eMagnetic shim\u003c\/li\u003e\n\u003cli\u003eEmbossing folder with card\/paper inside\u003c\/li\u003e\n\u003cli\u003ePlastic shim\u003c\/li\u003e\n\u003c\/ul\u003e\n\u003cp class=\"p1\"\u003eTIPS:\u003c\/p\u003e\n\u003cp class=\"p1\"\u003eOur 3D embossing folders add gorgeous texture to your projects! The effects can vary depending on the materials used - paper thickness and \"hand\" will have an effect on your results.\u003c\/p\u003e\n\u003cp class=\"p1\"\u003eSince embossing requires the paper to stretch and mold, it's typically better to use papers that have a soft, flexible texture rather than papers with a “crisp” surface or hand. Medium weight papers (80-100lb) typically provide the best results. Some of our favorite cardstock brands for embossing include Colorplan, Materica, and also the Construction and Pop-Tone collections from French paper.\u003c\/p\u003e\n\u003cp class=\"p1\"\u003eIn addition to using appropriate materials and sandwiches, here are a few tips for getting the best, smoothest, most beautiful embossing possible:\u003c\/p\u003e\n\u003cul class=\"ul1\"\u003e\n\u003cli class=\"li1\"\u003e\n\u003cspan class=\"s1\"\u003e\u003c\/span\u003eMist your paper. You can mist front and back, or if you have done stenciling or inking as a first step, mist from the backside only. Allow a few moments for the paper fibers to absorb the moisture before running it through your machine.\u003c\/li\u003e\n\u003cli class=\"li1\"\u003e\n\u003cspan class=\"s1\"\u003e\u003c\/span\u003eInclude a piece of wax paper in your sandwich (the stuff on a roll in your kitchen drawer!). Place a piece on top of your cardstock (between the right side of your cardstock and the folder), waxy side towards your folder so that it doesn't give off onto your cardstock. \u003c\/li\u003e\n\u003cli class=\"li1\"\u003e\n\u003cspan class=\"s1\"\u003e\u003c\/span\u003eBack your cardstock with a piece of Press n Seal (again from your kitchen drawer!). Place a piece of Press n Seal on the back side of your cardstock, sticky side against the backside of the paper. You can cover the whole sheet or just a portion as needed. Once embossed, just leave it on the backside of your cardstock and attach the embossed panel or element to your project.\u003c\/li\u003e\n\u003cli class=\"li1\"\u003e\n\u003cspan class=\"s1\"\u003e\u003c\/span\u003eSpeaking of Press n Seal, it's a great tool for adding a bit of tacky surface to your folder. Place a piece of it inside your folder and run it through your machine (no paper). After running it through, remove it from your folder and the surface is now tacky, making it a bit easier to line up diecuts inside your folder. \u003c\/li\u003e\n\u003cli class=\"li1\"\u003eEmbossing can cause slight changes in size of paper and design elements, due to the paper expanding and molding to the embossed design. To accomodate this, you may want to start with a slightly larger panel than your desired finished size. For example, if your finished card size is 5x7, you may want to start with a 5-1-\/4\" x 7-1\/4\" panel, then trim after embossing. \u003c\/li\u003e\n\u003cli class=\"li1\"\u003eThis expansion can also cause some shifting when combining stenciling or stamping with embossing. One of our favorite techniques it to stencil first, then emboss by running your sandwich half-way through your machine and back out, then repeat this half-in, half-out process starting from the opposite end. This helps reduce the \"stretch\" that occurs from running your sandwich though in a single direction. You might find it easier to emboss first and then stencil - this is personal preference and you should choose whichever method you prefer.\u003c\/li\u003e\n\u003c\/ul\u003e\n\u003cp\u003eThe best technique from the list above is very dependent on the materials used, so we recommend doing a bit of experimenting before committing to a large scale project to make sure your materials are creating the desired results.\u003c\/p\u003e","published_at":"2026-10-14T06:00:09-05:00","created_at":"2026-09-29T10:54:12-05:00","vendor":"The Greetery","type":"Embossing Folder","tags":["capsule","embossing folders","Holiday 2026","Holiday 2026 Week 1","swym-disabled"],"price":1400,"price_min":1400,"price_max":1400,"available":false,"price_varies":false,"compare_at_price":null,"compare_at_price_min":0,"compare_at_price_max":0,"compare_at_price_varies":false,"variants":[{"id":67582584619309,"title":"Default Title","option1":"Default Title","option2":null,"option3":null,"sku":"GEMB-025","requires_shipping":true,"taxable":true,"featured_image":null,"available":false,"name":"Capsule Quilt Shop Embossing Folder","public_title":null,"options":["Default Title"],"price":1400,"weight":99,"compare_at_price":null,"inventory_management":"shopify","barcode":null,"requires_selling_plan":false,"selling_plan_allocations":[],"quantity_rule":{"min":1,"max":null,"increment":1}}],"images":["\/\/thegreetery.com\/cdn\/shop\/files\/coming-soon-holiday-26-WK1.jpg?v=1790705724","\/\/thegreetery.com\/cdn\/shop\/files\/capsule-quilt-shop-embossing-folder-the-greetery.jpg?v=1791343238"],"featured_image":"\/\/thegreetery.com\/cdn\/shop\/files\/coming-soon-holiday-26-WK1.jpg?v=1790705724","options":["Title"],"media":[{"alt":null,"id":46194954699053,"position":1,"preview_image":{"aspect_ratio":1.0,"height":1200,"width":1200,"src":"\/\/thegreetery.com\/cdn\/shop\/files\/coming-soon-holiday-26-WK1.jpg?v=1790705724"},"aspect_ratio":1.0,"height":1200,"media_type":"image","src":"\/\/thegreetery.com\/cdn\/shop\/files\/coming-soon-holiday-26-WK1.jpg?v=1790705724","width":1200},{"alt":null,"id":46209545044269,"position":2,"preview_image":{"aspect_ratio":1.0,"height":1800,"width":1800,"src":"\/\/thegreetery.com\/cdn\/shop\/files\/capsule-quilt-shop-embossing-folder-the-greetery.jpg?v=1791343238"},"aspect_ratio":1.0,"height":1800,"media_type":"image","src":"\/\/thegreetery.com\/cdn\/shop\/files\/capsule-quilt-shop-embossing-folder-the-greetery.jpg?v=1791343238","width":1800}],"requires_selling_plan":false,"selling_plan_groups":[],"content":"\u003cp\u003e\u003ca href=\"https:\/\/\/thegreetery.com\/collections\/capsule-quilt-shop\" title=\"capsule quilt shop suite\"\u003eOur Capsule Quilt Shop suite\u003c\/a\u003e wraps your Capsule Basics up in warm and cozy quilted goodness! This embossing folder coordinates with our \u003ca title=\"capsule basics die\" href=\"https:\/\/thegreetery.com\/products\/capsule-basics-die\"\u003eCapsule Basics die\u003c\/a\u003e and the other products from our \u003ca href=\"https:\/\/\/thegreetery.com\/collections\/capsule-quilt-shop\" title=\"capsule quilt shop\"\u003eCapsule Quilt Shop suite\u003c\/a\u003e, allowing you to create gorgeous embossed designs. Add some color by pairing this embossing folder with our \u003ca href=\"https:\/\/\/thegreetery.com\/products\/capsule-quilt-shop-stencil\" title=\"capsule quilt shop stencil\"\u003eQuilt Shop stencil\u003c\/a\u003e, or create individual embossed accents by pairing this embossing folder with the matching \u003ca href=\"https:\/\/\/thegreetery.com\/products\/capsule-quilt-shop-die\" title=\"capsule quilt shop die\"\u003eQuilt Shop die\u003c\/a\u003e. The oval border that's incorporated into the design also coordinates with our \u003ca href=\"https:\/\/thegreetery.com\/products\/capsule-fixed-borders-large-die\" title=\"capsule fixed borders large die\"\u003eCapsule Fixed Border Large die\u003c\/a\u003e, making quick and easy work of creating pretty embossed frames. So many fun options with this set! \u003c\/p\u003e\n\u003cp\u003e\u003cspan style=\"font-family: -apple-system, BlinkMacSystemFont, 'San Francisco', 'Segoe UI', Roboto, 'Helvetica Neue', sans-serif; font-size: 0.875rem;\"\u003eFor more ideas, visit our \u003c\/span\u003e\u003ca href=\"https:\/\/thegreetery.com\/pages\/capsule-quilt-shop-lookbook\" title=\"capsule quilt shop lookbook\" style=\"font-family: -apple-system, BlinkMacSystemFont, 'San Francisco', 'Segoe UI', Roboto, 'Helvetica Neue', sans-serif; font-size: 0.875rem;\"\u003eLookbook\u003c\/a\u003e\u003cspan style=\"font-family: -apple-system, BlinkMacSystemFont, 'San Francisco', 'Segoe UI', Roboto, 'Helvetica Neue', sans-serif; font-size: 0.875rem;\"\u003e!\u003c\/span\u003e\u003c\/p\u003e\n\u003cp\u003e\u003cspan style=\"font-family: -apple-system, BlinkMacSystemFont, 'San Francisco', 'Segoe UI', Roboto, 'Helvetica Neue', sans-serif; font-size: 0.875rem;\"\u003e\u003cstrong\u003eNote:\u003c\/strong\u003e This embossing folder is deeply etched and very detailed, therefore we recommend pairing it with papers with a soft hand for smoother embossing. For papers that have a crisper surface we recommend pairing it with the coordinating star detail die, which gives the deeply embossed areas more freedom to expand. See the Sandwich \u0026amp; Tips tab within this description box for more tips, etc. \u003c\/span\u003e\u003c\/p\u003e\n\u003cp\u003eEmbossed design fills a 5\" x 7\", but the interior portion is designed to fit nicely on A2 cards. \u003c\/p\u003e\n\u003ch2\u003eRelated Videos\u003c\/h2\u003e\n\u003ch2\u003eSandwich Recommendations \u0026amp; Tips\u003c\/h2\u003e\n\u003cp\u003eOur 3D embossing folders can be paired with most table-top diecutting machines on the market. Refer to your machine's manual for the recommended sandwich specifically for \u003cstrong\u003e3D embossing folders\u003c\/strong\u003e. \u003c\/p\u003e\n\u003cp\u003eHere are the recommended sandwiches for some of the more popular machines:\u003c\/p\u003e\n\u003cp class=\"p1\"\u003eSpellbinders Platinum 6:\u003c\/p\u003e\n\u003cul class=\"ul1\"\u003e\n\u003cli class=\"li1\"\u003e\n\u003cspan class=\"s1\"\u003e\u003c\/span\u003eBase Plate\u003c\/li\u003e\n\u003cli class=\"li1\"\u003e\n\u003cspan class=\"s1\"\u003e\u003c\/span\u003eembossing folder with paper inside\u003c\/li\u003e\n\u003cli class=\"li1\"\u003e\n\u003cspan class=\"s1\"\u003e\u003c\/span\u003eAdapter plate D (it’s typically a grey plate, on older models it may be dark blue)\u003c\/li\u003e\n\u003c\/ul\u003e\n\u003cp class=\"p1\"\u003eBig Shot or Vagabond:\u003c\/p\u003e\n\u003cul class=\"ul1\"\u003e\n\u003cli class=\"li1\"\u003e\n\u003cspan class=\"s1\"\u003e\u003c\/span\u003eStandard platform base\u003c\/li\u003e\n\u003cli class=\"li1\"\u003e\n\u003cspan class=\"s1\"\u003e\u003c\/span\u003eThin die adapter\u003c\/li\u003e\n\u003cli class=\"li1\"\u003e\n\u003cspan class=\"s1\"\u003e\u003c\/span\u003eEmbossing folder with paper inside\u003c\/li\u003e\n\u003cli class=\"li1\"\u003e\n\u003cspan class=\"s1\"\u003e\u003c\/span\u003eClear cutting plate\u003c\/li\u003e\n\u003c\/ul\u003e\n\u003cp class=\"p1\"\u003eCuttlebug:\u003c\/p\u003e\n\u003cul class=\"ul1\"\u003e\n\u003cli class=\"li1\"\u003e\n\u003cspan class=\"s1\"\u003e\u003c\/span\u003eBase plate A\u003c\/li\u003e\n\u003cli class=\"li1\"\u003e\n\u003cspan class=\"s1\"\u003e\u003c\/span\u003eembossing folder with paper inside\u003c\/li\u003e\n\u003cli class=\"li1\"\u003eC plate\u003c\/li\u003e\n\u003c\/ul\u003e\n\u003cp\u003eGemini\/Gemini Jr:\u003c\/p\u003e\n\u003cul\u003e\n\u003cli\u003eBase clear cutting plate\u003c\/li\u003e\n\u003cli\u003eMagnetic shim\u003c\/li\u003e\n\u003cli\u003eEmbossing folder with card\/paper inside\u003c\/li\u003e\n\u003cli\u003ePlastic shim\u003c\/li\u003e\n\u003c\/ul\u003e\n\u003cp class=\"p1\"\u003eTIPS:\u003c\/p\u003e\n\u003cp class=\"p1\"\u003eOur 3D embossing folders add gorgeous texture to your projects! The effects can vary depending on the materials used - paper thickness and \"hand\" will have an effect on your results.\u003c\/p\u003e\n\u003cp class=\"p1\"\u003eSince embossing requires the paper to stretch and mold, it's typically better to use papers that have a soft, flexible texture rather than papers with a “crisp” surface or hand. Medium weight papers (80-100lb) typically provide the best results. Some of our favorite cardstock brands for embossing include Colorplan, Materica, and also the Construction and Pop-Tone collections from French paper.\u003c\/p\u003e\n\u003cp class=\"p1\"\u003eIn addition to using appropriate materials and sandwiches, here are a few tips for getting the best, smoothest, most beautiful embossing possible:\u003c\/p\u003e\n\u003cul class=\"ul1\"\u003e\n\u003cli class=\"li1\"\u003e\n\u003cspan class=\"s1\"\u003e\u003c\/span\u003eMist your paper. You can mist front and back, or if you have done stenciling or inking as a first step, mist from the backside only. Allow a few moments for the paper fibers to absorb the moisture before running it through your machine.\u003c\/li\u003e\n\u003cli class=\"li1\"\u003e\n\u003cspan class=\"s1\"\u003e\u003c\/span\u003eInclude a piece of wax paper in your sandwich (the stuff on a roll in your kitchen drawer!). Place a piece on top of your cardstock (between the right side of your cardstock and the folder), waxy side towards your folder so that it doesn't give off onto your cardstock. \u003c\/li\u003e\n\u003cli class=\"li1\"\u003e\n\u003cspan class=\"s1\"\u003e\u003c\/span\u003eBack your cardstock with a piece of Press n Seal (again from your kitchen drawer!). Place a piece of Press n Seal on the back side of your cardstock, sticky side against the backside of the paper. You can cover the whole sheet or just a portion as needed. Once embossed, just leave it on the backside of your cardstock and attach the embossed panel or element to your project.\u003c\/li\u003e\n\u003cli class=\"li1\"\u003e\n\u003cspan class=\"s1\"\u003e\u003c\/span\u003eSpeaking of Press n Seal, it's a great tool for adding a bit of tacky surface to your folder. Place a piece of it inside your folder and run it through your machine (no paper). After running it through, remove it from your folder and the surface is now tacky, making it a bit easier to line up diecuts inside your folder. \u003c\/li\u003e\n\u003cli class=\"li1\"\u003eEmbossing can cause slight changes in size of paper and design elements, due to the paper expanding and molding to the embossed design. To accomodate this, you may want to start with a slightly larger panel than your desired finished size. For example, if your finished card size is 5x7, you may want to start with a 5-1-\/4\" x 7-1\/4\" panel, then trim after embossing. \u003c\/li\u003e\n\u003cli class=\"li1\"\u003eThis expansion can also cause some shifting when combining stenciling or stamping with embossing. One of our favorite techniques it to stencil first, then emboss by running your sandwich half-way through your machine and back out, then repeat this half-in, half-out process starting from the opposite end. This helps reduce the \"stretch\" that occurs from running your sandwich though in a single direction. You might find it easier to emboss first and then stencil - this is personal preference and you should choose whichever method you prefer.\u003c\/li\u003e\n\u003c\/ul\u003e\n\u003cp\u003eThe best technique from the list above is very dependent on the materials used, so we recommend doing a bit of experimenting before committing to a large scale project to make sure your materials are creating the desired results.\u003c\/p\u003e"}